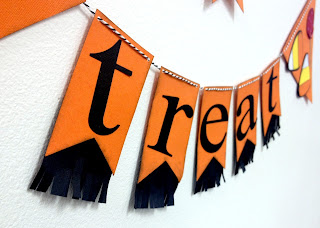
As soon as I saw this kit, I knew it could so easily be transformed to the cutest Halloween banner. And, seriously, this project is easy peasy! Talk about a perfect seasonal craft for you and your kiddos! The original kit,
Trick or Treat, is available NOW on our
website.
Original Kit
Banner Project
The best part about this transformation is that I pretty much only used what was in the kit and even had stuff leftover! Woohoo!
The
Trick or Treat kit includes:
I needed one additional sheet of
AC Apricot Cardstock and approximately 3 yards of Black & White Bakers Twine.
Note: You're in luck! We sell individual sheets and 25-count paper packs of the American Crafts cardstock. Click here to view all the colors. We don't currently sell twine by-the-yard, but the
Scrapbook Superstore has some awesome and affordable options! Check out
this twine by American Crafts.
Project Details:
You can take all the die-cuts out of the kit and assemble them. I like inking the edges of everything (as you probably already know!), so I did that (using black ink) before gluing everything together. For paper die-cuts, we like to use a quick-drying liquid glue like
Tombow - Mono Multi Liquid Glue or
Scotch Quick Dry Tacky Glue. The kit comes with ribbon for embellishing the candy pieces. You can tie bows around the sucker and caramel apple sticks or just knot and attach using
Mini Glue-Dots. (Yes, I like quick & easy!)
Now it's time to create the banner pieces. I used various pennants downloaded from the
Silhouette store for my die-cuts. Alternatively, you could use a paper trimmer or free-hand cut each piece. All the pieces were cut from the
AC Apricot cardstock.
As I mentioned above, I needed one extra sheet of this color in order to cut all the banner parts; the kit includes two, but you'll need three total.
Here are the approximate dimensions of the pieces:
- Banner (for trick word) - 3.5 inches H x 11.5 inches W
- Half-Ovals - 4 inches H x 4.5 inches W (you need two)
- Star - 4 inches x 4 inches
- Triangle - 8 inches H x 7.5 W (you need two)
- Banner (for treat letters) - 4 inches H x 2.75 inches W (you need five)
After cutting all your pieces, you can choose to ink the edges as I did. If not, add the die-cuts as shown or mix things up and add your own creativity!
The next thing I did was create the paper fringe accent on the bottoms of the "treat" banners. To do this, I simply cut a TWO 2.5 inch x 12 inch strip from the included black cardstock. Then cut each of those strips into 2.5 inch x 2.5 inch blocks. Using a standard office scissors (with a long reach), make upward cuts. Be careful not to trim all the way through or to overlap previous cuts. Here's what it should look like once you're done with a block.
Notice that it doesn't need to be perfect! You'll be hiding most of it behind each banner piece.
Attach these about 2 inches up from the bottom of each letter banner (treat). About 1.5 inches will show on the bottom of the banner. To create the texture, use your fingers to scrunch single lines of the "fringe". I did a few forward then a few backward, then a few forward, and so on.
Next, use a medium-size hole punch to add holes at the top corners of each piece. The only exception is the star - put those holes on on the middle points.
Note: Either 1/8 inch or 3/16 inch work best, but you can use a standard office punch if that's all you have. Just realize the holes will be more visible from afar.
Finally, string your pieces using that
B&W Baker's Twine I mentioned earlier. First, get the star piece attached by stringing the twine through the star on the back (you'll need 12 inches or less of the twine) and then use tape to attach to the "trick" piece. I used a piece about one yard long for the ghosts & trick banners and a piece around 2 yards long for the rest. I liked the added interest in having two separate hanging pieces, but feel free to switch things up for your space!
Tip: For most of project, I weaved the twine through the front of each piece so it would show at the top. The only exception was the "Trick" piece because there wasn't enough room on the top and I didn't want it to distract. If you use the smaller hole punch as I list above, you won't have too much trouble with things sliding around and the various pieces coming off. And now you're done! Pretty simple, right?! What a fun decor item to hang on your fireplace mantel, on your front door or porch, or even in your child's room as decoration!
Did you enjoy this project?
Be sure to comment below if you did!
Would you like to see projects like this pre-packaged for sale? Let us know!
Thanks for visiting and happy crafting!


