Thursday, February 28, 2019

February Page Kit Roundup

The shortest month of the year has come to a close, but what a big month it's been! If you live in the Midwest, you're likely still digging out from the massive amounts of snow we've gotten this month! And if you've been following us on our Facebook page or opening your VIP emails, you'll know we've also had a whole lot going on in our Scrapbook world, too! We've been steadily retiring our older kits to make room for our new ones and February was FULL of fan favorites! Here's a quick roundup of this month's additions. 


Riding Fun is great for your horse lovers!

First Haircut Girl. Don't miss preserving those First Haircut memories! 

First Haircut Boy

Released on Valentine's Day, I Love You is a great kit for so many of your loved ones!

Caution Kids at Play has been a HUGE fan favorite!

With thousands of waterfalls throughout the world, Chasing Waterfalls is a great addition to our Travel section.

Vacation Tropical is flying off the shelves! We LOVE it's fun beachy vibes!

Tooth Fairy Boy is great for this big milestone!

Tooth Fairy Girl
To round out our February, we released three new Destinations kits! Aloha is a great new addition to our crew!

Germany! 
Italy Sights


We've got more great kits to come in March, so stay tuned! As always, you can find all of our kits in our Down Memory Lane online store! Happy Scrapping!

Wednesday, February 6, 2019

Heart Punch Valentine Cards

It's almost Valentine's Day and, as usual, it crept up faster than I thought. With my little dude in daycare and 4K and with lots of grandmas and grandpas, I've got a lot of Valentine cards to make. I decided whatever I did needed to be simple, so I grabbed my heart punches and some spare cardstock and just started playing around. I thought I'd share my creations here for anyone looking for last-minute inspiration!

I was able to make 6 different cards just mixing patterned paper and cardstock and using punched out hearts. Here's the group:


Here's what you need: 
-Card bases. I used all white, but you can use any color.
-Coordinating colored paper in various patterns and sizes. I made sure I had some solid colored cardstock and some patterned paper. I also made sure some pieces were large enough to use as background pieces. Basically, just grab a variety from your stash. :)
-Heart paper punches. I used a variety of sizes so I had many options. I used 1/2", 1", 1 1/2" and 2".
-Adhesive
-Embellishments. I used gemstones, bakers twine and ribbon.

We'll take a closer look at each one and talk through my design process.


I decided to do some color blocking with this kit to make a simple design feature. The dark pink is 1/2" x 5 1/4". The white is 1/4" x 5 1/4". Light pink is 4" x 5 1/4". I then alternated hearts with white and pink backgrounds keeping the pattern colors compatible. I used the 1.5" punch to create these hearts. The gems were a final addition to add a little bit of glam.


I wanted to try a few different things with this card and I love how it turned out. I cut the pink cardstock to 4" x 5.25" and then placed the pattern piece (2"x 4") over it. The gathered hearts are 2", 1.5", 1", and .5" and the hearts along the side are all 1". I placed a large gemstone in the center of each of the these and ran some light pink gingham ribbon behind the group of hearts.


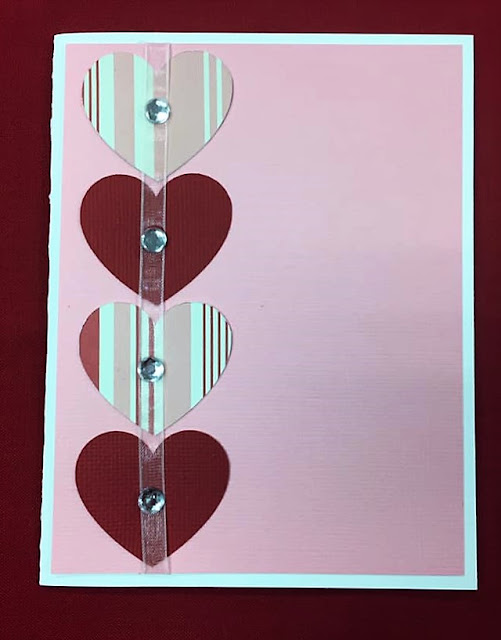
This card is very simple, but, to me, simple is good. I simply alternated 2" hearts in patterned paper and cardstock and then ran a sheer pink ribbon through the center of them. The medium gemstones anchor the ribbon and give the card a little excitement. You could leave this card as is or easily place a stamp on the right side.


This card is also very simple, but the effect is fantastic! I used all 1" hearts in various reds and pinks. I then alternated red lines and pink lines creating this puzzle pattern. Pink and clear dew drops add a little dimension to the card.


How can we do a set of Valentine cards without doing some heart balloons? I chose coordinating colors and patterns to punch 2" hearts and then gathered them together in a bunch. I used solid red bakers twine for the strings and tied them off with a light pink gingham ribbon. The background cardstock is light pink with small white dots. It's subtle enough to add to the card, but not to pull focus from the balloons.

There's a surprise in this card! I used some of the 2" hearts to create a waterfall surprise message inside.


I used a similar method to creating a waterfall photo album to create this pull-out message. You can find my previous tutorial here


This is definitely my favorite card of the bunch. I like non-traditional colors and it's 3D! I lightly pattern mixed here, which I also love. I chose the large yellow and white stripes as the background because it gave it a bright pop of color witout being too busy. This white and multicolor striped paper is SO pretty in person. The colors are soft and are beautiful. It was perfect for some heart balloons. So how did I make these beauties? Simple. You take four 2" hearts for each balloon. Each heart should be folded in half, with the side you want facing out on the inside of the fold. Then, you'll glue the backsides of the hearts together to create a bit of an accordion. Once the hearts are all glued together, you should have a simple 3D balloon heart. I then used solid purple bakers twine for the strings and gathered them with sheer pink ribbon.

I hope these have given you some inspiration for your Valentines crafts and cards! I'd love to know which card is your favorite! Let me know in the comments! Happy Scrapping!

Tuesday, February 5, 2019

Kit Makeover: Riding Fun

One of my favorite things to do is to take an original layout and use it as a jumping off point to create something fun. When I saw our newest page kit, Riding Fun, I got really excited. When I think of riding, I remember a few of my childhood friends who loved horses and would ride at every opportunity. I am reminded of their riding clothing which was often full of sparkly rhinestones, but were tough and feminine at the same time. I wanted to try to bring that feel into this layout with a few simple additions of lace and gems.

Before I show you the additions, let's take a peek at the original. 


Original Riding Fun Layout
I love this layout so much! It's super cute as is, but wait until you see the changes.

Riding Fun Layout with Embellishment Additions
I love the completed look! These simple changes with just a couple of items achieves a great look without changing too much about the layout. And these changes only took a few minutes! Below you'll find some close-ups of the changes.

Left page with personalization
I don't know many show riders who ride without rhinestones, so I had to find a way to add some to the rider on this layout. I had some tiny black gems that I thought would look great as boot studs and a belt buckle. I love that they are subtle, but sparkly.

When I saw the layout I knew I wanted to incorporate lace in some way. I picked up this lace trim from a local fabric store and it is the perfect addition for these page kits. It's delicate, but it doesn't overwhelm the photo mats or the layout.

Right Side with Personalization

The small rhinestones on these horseshoes add a little extra sparkle to the layout and make the horseshoes look a little more realistic at a distance.

I love this stable, and I saw an opportunity to add a little jute to the layout to look like a rope.

I simply wrapped the rope up and tied it off with thin brown jute. It is held to the layout with a brad and some glue dots. 
I really love how this layout turned out. The changes are simple and don't overwhelm the layout, but they add a lot to it. This is now perfect for those photos of your favorite horse riders!