Sunday, October 25, 2015

Sunday Wrap-up!

In case you missed any of the awesome NEW kits, we added over the past couple weeks, 
here's a recap for you:
Let's Play 2-page 12x12 scrapbook pagekit
Wine Tasting 2-page 12x12 scrapbook pagekit
First Halloween 2-page 12x12 scrapbook pagekit
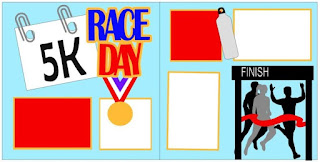
Race Day 5K 2-page 12x12 scrapbook pagekit
Race Day 10K 2-page 12x12 scrapbook pagekit
 Note: We can also do 13.1 or 26.2 for you marathoners! 
Just send us a quick email or leave a comment with your order when you checkout.
Fall Fun 2-page 12x12 scrapbook pagekit
Family Memories 2-page 12x12 scrapbook pagekit
We love to receive feedback from our customers.  
Are there kit themes you'd like to see? Comment here or email us! 

Friday, October 23, 2015

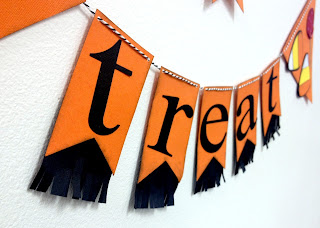
Trick or Treat - Kit to Banner Project

As soon as I saw this kit, I knew it could so easily be transformed to the cutest Halloween banner.  And, seriously, this project is easy peasy!  Talk about a perfect seasonal craft for you and your kiddos!  The original kit, Trick or Treat, is available NOW on our website.

Original Kit
Trick or Treat pagekit
Banner Project

The best part about this transformation is that I pretty much only used what was in the kit and even had stuff leftover!  Woohoo!

The Trick or Treat kit includes:
I needed one additional sheet of AC Apricot Cardstock and approximately 3 yards of Black & White Bakers Twine.  Note: You're in luck! We sell individual sheets and 25-count paper packs of the American Crafts cardstock.  Click here to view all the colors.  We don't currently sell twine by-the-yard, but the Scrapbook Superstore has some awesome and affordable options!  Check out this twine by American Crafts.
Project Details:

You can take all the die-cuts out of the kit and assemble them.  I like inking the edges of everything (as you probably already know!), so I did that (using black ink) before gluing everything together.  For paper die-cuts, we like to use a quick-drying liquid glue like Tombow - Mono Multi Liquid Glue or Scotch Quick Dry Tacky Glue.  The kit comes with ribbon for embellishing the candy pieces.  You can tie bows around the sucker and caramel apple sticks or just knot and attach using Mini Glue-Dots.  (Yes, I like quick & easy!)

Now it's time to create the banner pieces.  I used various pennants downloaded from the Silhouette store for my die-cuts.  Alternatively, you could use a paper trimmer or free-hand cut each piece.  All the pieces were cut from the AC Apricot cardstockAs I mentioned above, I needed one extra sheet of this color in order to cut all the banner parts; the kit includes two, but you'll need three total.

Here are the approximate dimensions of the pieces:
  • Banner (for trick word) - 3.5 inches H x 11.5 inches W
  • Half-Ovals - 4 inches H x 4.5 inches W (you need two)
  • Star - 4 inches x 4 inches
  • Triangle - 8 inches H x 7.5 W (you need two)
  • Banner (for treat letters) - 4 inches H x 2.75 inches W (you need five)
After cutting all your pieces, you can choose to ink the edges as I did.  If not, add the die-cuts as shown or mix things up and add your own creativity!

The next thing I did was create the paper fringe accent on the bottoms of the "treat" banners.  To do this, I simply cut a TWO 2.5 inch x 12 inch strip from the included black cardstock.  Then cut each of those strips into 2.5 inch x 2.5 inch blocks.  Using a standard office scissors (with a long reach), make upward cuts.  Be careful not to trim all the way through or to overlap previous cuts.  Here's what it should look like once you're done with a block.  Notice that it doesn't need to be perfect! You'll be hiding most of it behind each banner piece.

Attach these about 2 inches up from the bottom of each letter banner (treat).  About 1.5 inches will show on the bottom of the banner.  To create the texture, use your fingers to scrunch single lines of the "fringe".  I did a few forward then a few backward, then a few forward, and so on.

Next, use a medium-size hole punch to add holes at the top corners of each piece. The only exception is the star - put those holes on on the middle points.  Note: Either 1/8 inch or 3/16 inch work best, but you can use a standard office punch if that's all you have. Just realize the holes will be more visible from afar.

Finally, string your pieces using that B&W Baker's Twine I mentioned earlier.  First, get the star piece attached by stringing the twine through the star on the back (you'll need 12 inches or less of the twine) and then use tape to attach to the "trick" piece.  I used a piece about one yard long for the ghosts & trick banners and a piece around 2 yards long for the rest.  I liked the added interest in having two separate hanging pieces, but feel free to switch things up for your space! Tip: For most of project, I weaved the twine through the front of each piece so it would show at the top.  The only exception was the "Trick" piece because there wasn't enough room on the top and I didn't want it to distract.  If you use the smaller hole punch as I list above, you won't have too much trouble with things sliding around and the various pieces coming off.  And now you're done! Pretty simple, right?!  What a fun decor item to hang on your fireplace mantel, on your front door or porch, or even in your child's room as decoration!

Did you enjoy this project?  
Be sure to comment below if you did! 
Would you like to see projects like this pre-packaged for sale?  Let us know! 
Thanks for visiting and happy crafting!

Thursday, October 22, 2015

What Happens in Vegas, Stays in Vegas!

Here we go! Another pocket-style scrapbook layout for you! Nothing fancy with this one...I just used the Kit content plus some extra cardstock.  I also modified some of the die-cuts to better fit the pockets and added a fun cut-out using the Silhouette Studio software.

"What Happens in Vegas" Pocket Page

"Las Vegas" Page Kit
Available for Sale on our website.
Travel pages (or even entire vacation albums!) are made to be scrapbooked using pocket-pages. Why? If you're like me, you take lots & lots & lots of photos! And while you can scrapbook all those pages in a traditional manner, deciding on a layout, cropping the photos, and such can take a lot of time.  But with pocket-pages, you have standard sizes (often 4x6 or 4x4) and the layout is done for you! And if straight-up pocket-page scrapbooking isn't for you, you can definitely still use the pages mixed in with your regular pages.  It's really more like the old-fashioned photo albums, but completely photo-safe, and still allows you to express your creativity!

Let's talk about the adjustments I made when creating my Las Vegas pocket-page.
  • I shrunk down the Las Vegas sign die-cuts to fit in a 4x6 pocket.  Of course, depending on the protectors you decide on (based on your photo sizes and orientations), you might have room for the larger sign.  
    • Another option would be cutting it into pieces and including parts in various pockets.  Here's an example of what I mean:
Photo Credit: Me & My Big Ideas Blog - April Orr, Designer
See how the designer spread the large photo over multiple pockets?
You could do this same technique with embellishments, your title, and more! 
  • I created the left-side page accent using Silhouette Studio.  If you have purchased a Silhouette, you received the Studio software and that's all you need! (You can also upgrade to Designer Edition which will give you some more design options.)  I wanted part of the words to cut out of the paper and then the word "Vegas" to placed on top.  Sometimes I just get ideas in my head and even though that detail isn't very noticeable, it's the effect I wanted! To create this die-cut page accent, I found a couple fonts I liked.  Did you know? With the Silhouette, you can use ANY (yes, any) font!  I love checking out all the newest fonts on dafont.com.  There's even an option to preview the font using whatever word you like! I wanted the "Vegas" words to stand out more, so I choose a more playful font.  I didn't want to mess with the insides of the letters (i.e. from the "A" and "P") so I used the Stencil-technique
Pssst...if you're NEW to the Silhouette and need a good resource, be sure to check out the Silhouette School Blog! You can search for different topics or follow her "beginners" guide.  
Lots of good info on that blog!!!
  • And, of course, I inked the edges of all the die-cuts and accents.
And that's it! Pretty straight-forward.  Are you enjoying our tutorials on how to use our kits for other projects? Is there a project you'd like to see? If so, please comment.  Thanks for visiting today and happy crafting!

Thursday, October 15, 2015

Pocket Page How-To

Pocket Scrapbooking is all the rage right now.  You can buy cards in ever color, theme, and size.  So many options - Project Life, Simple Stories SNAP, MAMBI Pocket Pages, etc.  Trust me, it's hard to decide on what to use...which is why I just buy them all!  Today though, we're going to be showcasing how to use one of our kits, "Wish Big" as a pocket scrapbook page.  It's easier than you think! We've incorporated some fun cards by MAMBI and Project Life too.  And be sure to read to the bottom - we've got an EXCLUSIVE offer for Blog readers! (Offer valid through 10/16/2015 only.)

Here's our original kit - pretty cute, right?! 
Wish Big 12x12 Scrapbook Page Kit - Available Online

And here's our transformation into a pocket page.

The first step in the transformation was identifying which style of page protector I'd need.  There are lots of different layout options available in pocket pages.  And even different album sizes to boot! I chose a 12x12 page; then I can put it in my regular album next to traditional scrapbook pages.  Note: We R Memory Keepers 3-ring albums are awesome for this because they're super durable!  I prefer the ring binders because it makes moving pages around and taking them out easy as pie!  The protectors used are part of the WER Albums Made Easy line.  The left side is a protector with six 4x6 pockets.  The right page is a protector with four 6x4 inch pockets and three 4x4 inch pockets.  (Keep in mind that you can buy pocket page protectors in 10-packs by style or in multi-packs.  Check out all the WER pocket page protectors here.)

I based my selection on two criteria:
  • Size and number of photos to include
  • Size of the kit cardstock and patterns included in the kit (and to include on page)
 ***You'll also need to consider whether or not you will crop any of the photos or papers to fit.

Because most of my photos looked best at full size, I found protectors that featured a lot of full 4x6 pockets.
Left Side
Right Side


Time for step 2! Now to determine photo placement.  Things were made a bit easier given the fact that I had photos with different orientations.  I also determined that I could crop down one of the photos to 4x4.  Now for the embellishment pockets.  I took an inventory of what was included in the kit - some 3x3 blocks in dark yellow, light yellow, light blue, and the stripe pattern.  Plus larger pieces of red and brown cardstock and a couple sheets of white cardstock.  Diecuts for the title, two different ballons, a party hat, candles, and some paper-ribbon accents were also included in the bag.  Sweet! Ok, now I knew what I had to work with.

For my page, I used one of the light yellow blocks, all three stripe pattern blocks, and all the diecuts.  I also used more of the light blue (Lagoon) and light yellow (Banana) cardstock than was included; we had scraps on hand so I didn't need whole sheets.   But....did you know? We sell all the cardstock colors used in the kits as either individual sheets or 25-packs.  Click here for single sheets or here for packs.  In addition, I wanted to add some pizzazz to the pages with pattern. This is where those fun cards (you can't seem to stop buying) come in....

Nearly all the cards I chose were from the Honey Core Collection of Project Life.  I did also utilize one card from MAMBI ("Good Times" card).  The one I used is just a plain ole' card, but I just found out you can get embellished cards too! I totally would have used one of those if I had known. Deciding on which cards to use and where to put them was trial-and-error.  When I scrapbook, I like to lay things out and try different things before gluing it all down.  I also tend to use this adhesive by Tombow.  It is marketed as permanent, but it works great for when you're still deciding on placement because you have a little time to pull things back up before it sets.  It's a true lifesaver!  And a page designed by Laura (that's me!)  wouldn't be complete without inked edges. If you missed our quick video tutorial on how to get this look, check it out!


 So that's it.  Pretty easy! And, for me,  a lot faster than a traditional page.  I like to still consider each pocket a separate design element so you can still have fun incorporating embellishments like brads, bling, stickers, diecuts and more.

Here are some close-ups of various parts of the layout so you can see the detail a little better.


Pocket Scrapbooking + Down Memory Lane Page Kits = Faster & Easier Pages!

We'd love to hear your thoughts on this project! Are you a pocket scrapbooker?  Or are you like me and mix in some pocket pages with your traditional pages?  If you haven't tried it yet, I'd totally encourage you to.  It can be a great way to catch-up on your scrapbooking and simplify the process! 

-----------------------------------------------------

And now for your EXCLUSIVE offer....
Do you love this idea and want to get your hands on the "Wish Big" kit? You're in luck! 
From 10/15/15 - 10/16/15, we're offering it at a special price! (Valid while supplies last.)

Find this kit under the Birthday category on the website.
Yep, get it for only $3.99! Click here to shop NOW! 
And be sure to take a look at all our kits because when you stock up, YOU save with
FREE shipping on orders of $75 or more!

-----------------------------------------------------

Thanks for visiting our Blog.  Stop back often and follow us so you don't miss out! 
Have a crafty day!


Wednesday, October 14, 2015

Page Kit to Card Kit Day 2 Details

Welcome back! I hope you're enjoying our page kit to card kit project.  As promised, we'll share the details on the remaining TWO cards and TWO gift tags.  If you're loving this idea, be sure to pick up your "Celebrate" kit before it sells out!

Keep reading for the Day 2 details on our project!
 
As a reminder, here's the Page Kit we're using to create our cards and tags.  Yep, just this kit plus a few papercrafting items and you're ready to rock n roll!
"Celebrate" 12x12 Scrapbook Page Kit

Card 5 - Hope Your Day Rocks


This one is probably my favorite! I used a fun trick that I learned from Down Memory Lane's owner, Joanne.  It's an easier way to create a shaped card since the entire card doesn't need to be a fancy shape, just the background piece! The kit comes with a 4.25x4.25 inchs callop square piece in brown and that's what I used for the background.  Then I layered a square of blue cardstock on top of that (3.75x3.75 inches).  Finally, using a trimmed down white card base (7 x 3.5 inches; then fold in half), I create the card piece.

Here's the card opened up. Cute!

 I used a small strip of the patterned paper to accent the card front and to create a little candle.  I again freehand cut the flame (you could also use a leaf punch or diecut shape).  If you like dimensional cards, you can pop up the frosting on the cupcake and the candle/flame piece like I did.  Reminder: These mini 3-D foam squares are awesome! The sentiment is from the "BeBoppin" stamp set as are the music note stamps.  I thought they added a fun touch.  If you have colored inks at home it would be neat to stamp the notes in various colors!


Additional Supplies:
Cardstock -White Smooth (card base)
Ink - Memento Rich Cocoa 
Sponge - Yellow Synthetic or Make-up wedge 
Stamps - Hope Your Day Rocks & Music Notes from "BeBoppin" by Paper Smooches


Card 6 - Happy Everything


For this card I used one of my favorite button techniques.  More on that to come! This is another standard A2 shaped card (8.5 x 4.25, then fold in half) and I used one of our White Card Bases.  On the front part, though, I trimmed off an inch so that I could add the scallop detail.  The scallop borders included in the kit were too wide so I trimmed it thinner.  I adhered it underneath the front to create a scallop overhang.  To create the top banner, I used small scraps of the cardstocks and patterned paper.  For the flag-shapes, use a rectangle piece and then snip in from the edges to the middle on one side.  For the triangle shapes, use a rectangle or square then cut diagonally from one edge to the center of the opposite side - repeat.  With the sentiment, I had a "happy accident".  I intended to stamp it directly on the white front, but I had some issues and it didn't turn out.  Shoot! But it was easily fixed by stamping on another bit of white and then fussy-cutting around it.  I popped it up for some added detail.  Note: I used a 1x5.5 inch strip of the patterned paper on the inside of the card.  You can "cheat" this detail as it appears from the front that the entire inside of the card is in the pattern.  It's actually useful though to only use a strip because then you have space to write on the inside on the white!

Lovely layers and a super fun button bow!
I love this button technique for cards & tags, especially holiday ones! Just take whatever thread/twine you want and pull it through opposite holes on the button (from the back).  Knot in front and then tie a bow.  Use the same technique you would to tie your shoelaces.  You can tweak it by pulling the loops and loose ends until you have it just right.  Then just snip the excess thread/twine off.  Darling, right?!


Additional Supplies:
Cardstock -White Smooth (card base)
Bakers Twine - American Crafts (Similar)
Ink - Memento Rich Cocoa 
Sponge - Yellow Synthetic or Make-up wedge 
Stamps - Happy Everything from "Simply Said" by Paper Smooches


Gift Tags 1 & 2 


Do you ever make your own gift tags? I do, but mostly at Christmas time.  I had some "leftovers" after doing my cards so I thought 'why not make some tags?'.  These are great for attaching to packages or gift bag handles.  Another option is to use plain gift bags and decorate the front with these tags or even a card front.  Great idea, right?  

For the left tag, I used one of the ribbon/flag pieces included in the kit as the tag base.  I cut a circle in white using the Silhouette and then trimmed a piece of cardstock and patterned paper to accent the tag.  Create a hole using your office punch and tie a little loop of bakers twine for easy attachment to your gift!  I used the "Alphadot" stamp set for the gift recipient area. 

For the right tag, I used a scrap of white for the base.  It's a simple rectangle, but I rounded the bottom two corners to give it a unique look. I incorporated the other ribbon/flag piece and overlapped it with a skinny strip of blue and a thicker piece of the pattern paper.  I had one green button left so I stuck that baby on the tag with some mini glue dots. Another hole and a loop of yellow bakers twine to complete the top.  For the sentiment, I used the "Retail Therapy" stamp set accented by some tiny flowers (also on that set).  Voila! Two simple tags complete!

Additional Supplies:
Cardstock -White 8.5 x 11 Smooth (leftover for tag)
Bakers Twine - American Crafts (Similar)
Ink - Memento Rich Cocoa 
Sponge - Yellow Synthetic or Make-up wedge 
Stamps -   "T", "O" and Dots from "Alphadot" by Paper Smooches
                A Gift for You & Mini Flower from "Retail Therapy" by Paper Smooches
Corner Rounder - Fiskars Squeeze Punch
Standard Hole Punch (office supply)
Silhouette Cameo (to cut circle)


Please comment and let us know if you enjoyed this project and give us ideas for card themes you'd like to see in the future!  Thanks for visiting our Blog and happy crafting!

Tuesday, October 13, 2015

Is it a Page Kit? Or is it a Card Kit?

We've had a lot of requests for card kits lately! Although we haven't had time to design a card kit (per se), we decided to use one of our existing kits and make some cards.  The only items we needed besides the Kit were stamps, ink, a sponge (for ink application), white cardstock/card bases, bakers twine and some basic paper crafting tools.  FYI: In case I forget to mention it in each individual card detail, I did ink nearly all the edges of the cards and diecut pieces.

Today I'll share the details for FOUR of these fun cards.
Be sure to come back to the blog tomorrow for the rest!

SIX Cards + TWO Gift Tags from one Page Kit!
"Celebrate" 12x12 Scrapbook Page Kit
The kit I used to create all those fabulous birthday cards and tags is "Celebrate" (shown above).  I love this kit because it's fairly gender-neutral featuring the greens and yellow cardstock.  If anything, it's a little more "guy" than "girl" which is perfect because I find it pretty difficult to locate good male birthday cards.  Anyway, read on for close-up pictures of each card plus a little more detail on the supplies used. 

Card 1 - Have a Super Day


To create this card, I used the teal paper in the kit for the card base.  The card is slightly smaller than a standard A6 (8.5 x 6 inches; then fold in half).  I trimmed the yellow scallop border so that it was thinner and used it as a border along the bottom.  I also trimmed the brown candle piece so that the entire cupcake would fit on the card front. I like a little dimension on my cards so for this one, I popped up the entire frosting layer along with the candle and flame.  You can use any pop-up adhesive, but I love these mini 3-D foam squares by Thermoweb.

See the dimension? Love those popdots!


I added the sentiment from the "Super" stamp set.  Then, using the tiny star from the "Beboppin" stamp set, I randomly stamped the stars in sets of three.  You'll also note that I inked the edges of all the shapes and the card using the same brown ink.  For a quick tutorial on this technique, check out our YouTube video here.


Additional Supplies:
Cardstock - White 8.5 x 11 Smooth (card front)
Ink - Memento Rich Cocoa 
Sponge - Yellow Synthetic or Make-up wedge 
Stamps - Have a Super Day "Super" by Paper Smooches
               Tiny Star "BeBoppin" by Paper Smooches


Card 2 - Celebrate 

The base on this card was made from the blue cardstock in the kit.  Again, it's an oversized card which was mostly due to the large die-cut word, Celebrate, that came in the kit.  It was too cute not to use on a card! Don't worry, though, you'll be able to find an envelope to fit it because it's an A7 (10 x 7 inches; then fold in half).  Basically all I did was cut the cardstocks and the a bit of the stripe pattern included into rectangles, decreasing the lengths to create a cake.  I wanted a softer edge on the cake "layers" so I used a corner rounding punch on all the pieces.  I freehand cut the flame and trimmed a small piece of the brown to create a candle.

See how I roughly outlined the letters?

I trimmed the Celebrate word from the kit and then used a craft marker to sketch around the edges of all the letters.  Before I did this, the word didn't seem to stand out as much as I wanted it to.  The finishing touch was the "confetti".  To create these little dots, I used a standard sized single hole-punch.  Who knew office tools could be so handy for scrapbooking?! Also, I again inked all the edges on this card.


Additional Supplies:
Ink - Memento Rich Cocoa 
Sponge - Yellow Synthetic or Make-up wedge 
Marker - Zig Writer in Black
Corner Rounder - Fiskars Squeeze Punch
Standard Hole Punch (office supply)


Card 3 - Surprise

This card was created on a white card base at standard A2 size (8.5 x 4.25 inches; then fold in half).  I used the green half circle diecuts in the kit to create a centerpiece area on the card front.  To disguise where the sides meet, I used two 1.75 inch diameter circles.  You could use a circle punch or a diecut machine (we love the Silhouette) to create this.  Similarly, I created a larger 2.75 inch diameter circle for the center from the included brown cardstock.  Using small pieces of cardstock, I freehand cut a small candle and flame.  Note: the cupcakes are attached in the kit, but you can simply cut them apart.  The frosting layer covers any wonky edges from trimming them apart.  I also decided to pop up the frosting and flame on this card.  To create the corner edges, simply cut some of the brown cardstock into squares (these are 1.5 inch).  Then, using a long scissors or your trimmer, cut in half diagonally....boom! Instant corners.

Neat trick! Thread through the button.
For accents, I used the kit's two white buttons.  To dress them up a bit, I cut small lengths of teal/white bakers twine and threaded it through the button-holes and tied it in a knot at the front.  To prevent the ends from fraying, I tied knots at the edges of the free ends.  I again used the tiny star to accent the green circle and added the sentiment from the "Good Gab" stamp set.  That corner rounder came in handy again too!  I used it on the "surprise" block.


Additional Supplies:
Cardstock - White Smooth (card base)
Bakers Twine - American Crafts (Similar)
Ink - Memento Rich Cocoa 
Sponge - Yellow Synthetic or Make-up wedge 
Stamps - Surprise "Good Gab" by Paper Smooches
               Tiny Star "BeBoppin" by Paper Smooches
Corner Rounder - Fiskars Squeeze Punch  
Silhouette Cameo (to cut circles)


Card 4 - For You

This little cutie is a 4x4 inch (8 x 4; then fold in half) card.  Note: Did you know? Square cards cost more to mail? Put this guy in an A2 envelope though and you'll pay standard rates!  I wanted something a little different for the background so I took a cue from my scrapbooks and created a "patchwork" background.  This technique is super easy but a tad time-consuming.  Luckily, cards are much smaller than a scrapbook page so it was less labor-intensive!

Isn't this background fun?!
I cut a random amount of 1x1 inch squares from my cardstock scraps. After inking all of them, I started at the top and began gluing the pieces down to the card base, row by row.  I did them a bit haphazardly (sort of a brick pattern) and then cut off the excess edges on the sides.  Like on the Celebrate card, I used a craft marker to sketch some detail on the cupcake piece.  I also used my Silhouette again to create a 3 inch diameter circle from white so that the cupcake wasn't "lost" in the patchwork background.  For the banner piece, I used a small strip of white and stamped "For You" from the "Word Up" stamp set.  I then used my scissors to create the "ribbon edges"  It's easy! Just snip a small piece from each end using a sharp-tipped scissors.  I added a blue background, trimming it the same way.  To finish off the card, I tied a bit of red bakers twine on the top.

Additional Supplies:
Cardstock - White Smooth (card base)
Bakers Twine - American Crafts (Similar)
Ink - Memento Rich Cocoa 
Sponge - Yellow Synthetic or Make-up wedge
Marker - Zig Writer in Black
Stamps - Surprise "Word Up" by Paper Smooches
Silhouette Cameo (to cut circle)


To Be Continued....

Stay tuned for the details on the last TWO cards 
and the TWO gift tags tomorrow!  
Thanks for visiting and happy crafting!