It's a favorite challenge of mine to take our page kits, add some creativity, and make them my own. I could not wait to get my hands on I Love Candy. I love the bright, fun colors and I thought the possibilities were endless. Normally, I change one major item on each kit or focus on one design element, but this time, I decided to work in a few fun things. Before I show you the changes, let's look at this adorable kit!
And here are the changes:
 |
| I Love Candy after the revamp! Who knew you could get EVEN MORE COLOR in here?!? |
There's a lot going on here, so I'll break down the changes. I'm going to start with the addition of the adorable pattern paper and this great flag creation that was inspired by a process video by Marisa from the myscrappiness Youtube Channel. You can see these flags on the outer two pages of this kit expansion. It looks like carefully lined up strips of paper, but it's so much easier than that! Check out how I did it below:
 |
| I mean, come on! Isn't it the CUTEST! |
I have looked at this pattern paper so many times over the last year just hoping to come up with a way to use it. It's so bright and fun and adorable. I LOVE pattern paper like this. I just never know what to do with it except cut it into strips and try to piece them into the layout somehow. But sometimes, I get tired of doing the same thing over and over. But this simple trick uses this paper in such a cool way.
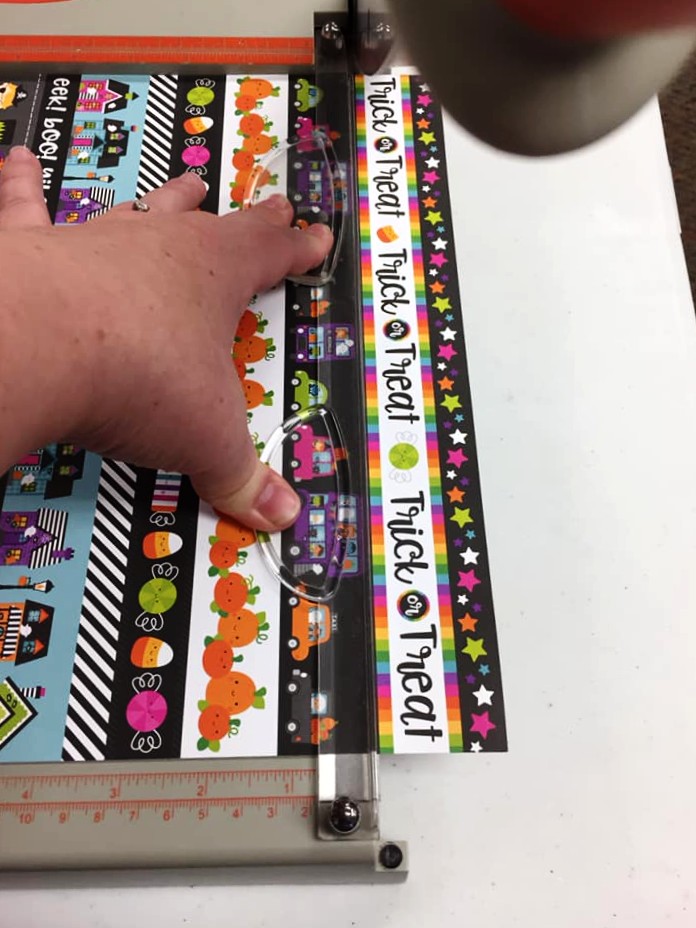
I knew I wanted to use most of this paper in the flag pieces because it's so darn cute all stacked up, but I love the look of the Trick or Treat line on top and I didn't want to cut it up, so I decided to lop that off and use that separately, which you can see below.
 |
| Lining it up on the paper trimmer |
 |
| Once I cut the Trick or Treat strip off, I decided to cut the stars off, too and use them separately. And I still had plenty of cardstock to do my project. |
 |
| I was playing around with options here, but I knew I had made the right choice when I laid this out. What a cute little strip! |
Let's take another quick look at our desired end result. You can see the full effect on the right side of this completed page.
The very first step is to decide how wide you'd like your flags to be. You'll be cutting into the sides of the paper, so the furthest point out will be the length of your first cut, and the inmost cut piece will be about 1 1/2" in from the edge. In order to make it simple and to use as much of this cute paper as possible, I decided to cut it directly down the middle so I had two pieces that were 6" wide.
 |
| Cut your paper to your desired width. I cut mine straight down the middle to have two 6" halves. |
 |
| The Two halves side by side. |
You'll notice that you cut some items in half - like this bus, pumpkin, and candy corn. Since I knew I'd be cutting into the paper to create the flags anyway, I chose to use these already-cut-in-half sides as the flag sides so I could keep the ends intact.
Once you've decided which side you want your flags to be on, you'll need to flip your paper over to mark your lines. On the edge you want to cut into, mark a straight line one inch in from the edge. I used a ruler and made a mark at one inch at the top and bottom and then used that ruler to connect the marks in a line.
Once you have your line drawn, flip your paper over and cut in to that line from the edge - using the strips as your guide. In order not to go over my 1 inch line, I cut small starter cuts from the top side and then flipped it over to continue the cut to the 1 inch line.
 |
| Using pattern paper with build in strips of color and patterns makes cutting in a line pretty easy! |
 |
| Finishing the small cuts to the 1 inch line. |
Once you have finished this, you will have created what look like 1 inch flaps along the side of your cardstock. Next, cut every other flap off using the 1 inch line as a guide.
 |
| Cut off every other flap with your scissors. |
 |
| When you've cut every other flap out, your remaining cardstock will look like this from the back. |
 |
| And like this from the front. |
 |
| I decided I wanted to have my flags face two different directions, so my tabbed pieces looked like this before I cut them into flags. |
Next, we will create the flags. For each tab - the outer tabs like the bus line below AND the inner tabs like the pumpkin line below, cut right in the center of the strip and about 1/2" deep from the edge of each strip.
 |
| I eyeballed the 1/2" mark and snipped. |
Starting from the corner of the strip and ending at the 1/2" deep cut, use your scissors to cut a triangle out of the end.
 |
| By cutting from the corner to the end of the 1/2" deep cut you already made, you'll complete the triangle shape and can remove it. |
Repeat this step, coming from the opposite corner of the strip to the end of the 1/2" deep cut to remove the second triangle and complete the flag.
Each section or strip will be completed just like this first strip until you get to the end of the rows.
 |
| For the inner strips, you'll follow the same steps, cutting in from the edge of the strip and stopping at 1/2" deep. |
 |
| Then cut from the corner of that strip to the end of the 1/2" deep cut, just like the outer strips. |
Your final result will be this incredibly cute line of flags that you can place in your layout! I just LOVE it!
Let's take a quick look at the results, page by page.
 |
| Page 1 - pattern flags and extra photo mats! |
On this first page, I lined up the straight side of the pattern paper on the edge and allowed the flags to point inward toward the other two pages. I filled in the black side with staggered, brightly colored photo mats, and added a few pieces of candy to tie it into the theme a little more clearly. I contemplated putting additional photo mats over the left side of the pattern paper, but it was so darn cute, I just couldn't cover it up. :)
 |
| Page 2 - Title pizzazz and pattern strip |
Because there is so much happening on the other pages of this layout, I decided to keep this relatively simple to anchor the design. I placed the title piece on the top, just turned a little bit to give it a bit of whimsy, and used popup dots to give some dimension. I also added a little bow of black, gingham ribbon to the sucker stick. I'm a "sucker" for little ribbon bows. I laid that Trick or Treat strip across the bottom and then snuck some extra candy in. I love the simplicity of this page.
 |
| Page 3 - Pattern Paper flags, pattern strip, and extra photo mats. |
On the final page, I used the second half of the pattern paper flags and pointed them back at the center, similar to the first page. But instead of lining the straight side with the edge of the background paper, I decided to line it up with some photo mats in a color blocking pattern to try a different design element. I love the bold colors, but to break them up just a little, I used that extra star strip to place a vertical line through them. Add a couple pieces of candy and we're set!
 |
| All together now! |
I absolutely adore how this turned out. This pattern paper is SO adorable and I'm so glad I finally found a great way to use it. And so simple! With just a 12 x 12 of pattern paper, a small piece of ribbon, and a little extra cardstock, I was able to revamp this layout into something that feels both original and super fun! I hope you give this pattern paper technique a try. You can find I Love Candy here on our website, and, for a limited time, we have this exact pattern paper and additional cardstock available on our website, too! Head on over to our online store and pick up your supplies to try it on your own. And then come back and let us know how it went! Happy Crafting!


2 comments:
How can we download or/and print out your directions for this
I love candy Revamp page kit?
Hello there, Hummingbird! Thanks for the question. I had to do a little digging to find out how to do it, but I was able to add some buttons to the bottom of each post so you can print, download to PDF, or email the post. To access it, you'll have to click on the title of the post you want to print/download/send, and you should see clickable buttons at the bottom on the left-hand side. Let me know how it works for you! ~ Chalsea :)
Post a Comment