Showing posts with label Other Crafts. Show all posts

Thursday, October 18, 2018

5 Minute Candy Corn Halloween Decoration

This Fall got away from me. We've been in full-on Fall and Halloween mode at DML, but you wouldn't know it if you looked at my house. Fall brings a host of changes in our family. My husband is a High School Football Referee, so he's MIA until mid-November or beyond - depending on playoff season. So I'm a man down, and I'm still struggling to figure out schedules and get places on time now that Nolan is in 4K. Man, I did not realize how much school takes over your life - even when you're not the one in it! So needless to say, we're two weeks out from Halloween, and all I've managed to do is put some gel clings on the window that I found in the dollar section at Target. And the only ones still up there are the ones we put high enough so our cat couldn't snag and eat them...

It's not the end of the world, I know. Halloween and Fall will be enjoyed whether my decorations match the festivity in my heart. But it's in my bones to make things fun and to create a magical world for my little guy - that magic goes away quickly if you don't feed it, so I remembered a simple candy corn banner I had seen that takes - literally - less than five minutes to assemble and put up, and I got to work. 

In case you're suffering from "It's all coming too fast!" syndrome like I am, here's a quick how-to that might help you get your mojo back. 

Isn't it the cutest?!? I added a few sparkly spiders and voila! Instant Halloween. 

Candy Corn Halloween Banner

First, you'll need to cut your cardstock into 3 sized of circles. You can determine your sizes, but the yellow circle should be the largest, orange should be a medium sized circle, and white should be the smallest. My circles were 4" in diameter (yellow), 3" in diameter (orange), and 2" in diameter (white). Once they are cut, glue them - one circle inside the other as shown below: 


Once your circles have been glued, cut them in half. I used a simple scissors. You could cut them by hand with a scissors or use a paper cutter.


After they have been halved, cut each half in to thirds. I eyeballed the first cut - starting at what looked like the center of the white half and cutting outward to a point on the yellow circle that seemed 1/3 of the way in. I then made my second cut, starting in the center of of the point made by my first cut and cutting out through the orange and yellow sections to create a total of 3 similar pieces from each half circle. 

Cut each half circle into thirds until you have a pile of paper candy corn. 

Next, using a hole punch, put two holes in the yellow section of the triangles. You'll be threading your string through these.


Once all the holes are punched, thread your string through until all the candy corn is on your string. I used black and white striped bakers twine, but any string that will fit through the holes will work. 

I spread out my candy corn to have about a half inch of space between each of them and then hung them up! Easy peasy! Give it a try - and get creative! You could swap traditional colors for something even more unique to you! Happy Crafting!


Happy Halloween!!


Wednesday, August 15, 2018

Project: First Day of School Photo Shoot Sign and Scrapbook Page


My boy is starting 4K this year. That’s what we call Pre-Kindergarten here in Wisconsin. I’m not sure how it happened, but I have a million emotions. My childhood best friend and I met when fate placed our desks next to each other on our very first day of school. Nolan is a social butterfly, so I’m SO excited for him to meet new friends and have new experiences. Of course, like most mamas, I’m a little sad about him getting so big. He will turn 5 just before his first day of school, and I just want to hang on to his little-ness. And since I can’t, my mind has turned to all the ways I can capture these moments. 

Look at this little cutie! AUGH! My Mama heart!

First day of school photos are a popular and simple way to start this. I also love those lists of questions to ask your kids – it’s a perfect way to document some of the cute things they say. I found a simple way to combine these in some cute portraits and then turn around and use them to complete a page in his album! Double win!


I love the look of the little chalkboard signs, so I modeled mine after them. I DIYed mine, but if you find a cute little chalkboard sign, that works! Here’s how I made it:

Items Needed:


  • First/Last Day of School Page Kit from DML - We'll use the die cuts from this kit to make our board and then transfer them all back to the page kit to complete our layout! So simple!

  • Medium-Large Sized Photo Frame or Simple Board - This will really be up to your taste. You could easily head to Michael's or Hobby Lobby and grab an inexpensive board or even use some thick foam board. I stopped into my local Goodwill store and hunted through the frames. I found this beauty for $5.99! It was big enough for me to  write all my information, but light enough for Nolan to hold. This gem was with a set of 3 other similar frames, so I chose the one whose frame was in the best shape - the picture doesn't matter; it'll be covered with paint.

  • Chalkboard Paint - This can be picked up at your local craft store or many big box stores. I believe I got this jar of chalkboard paint for $6.99 at Walmart years ago. It was originally used to spruce my son's play area so I wasn't super concerned about quality, but, boy, did I luck out here! This is GREAT quality! We've used it on many surfaces and it's held up very well and we've still got half a jar left!
  • Adhesive - You'll need adhesive to put your die cuts together and to then adhere your page kit. Your favorite adhesive will work just fine. This one is my favorite. It dries clear and pretty quickly. The design of the bottle is fantastic. It fits nicely and comfortably in my hand so I feel totally in control and the nozzle is super thin and seems to never gum up. I love it.
  • Chalk - Basic chalkboard chalk will do, here!
Instructions:

1.Take your clean frame or board and paint one layer of chalkboard paint. It's best to paint in one direction so it will dry uniformly. I like using the foam paint brushes to avoid brush strokes. Depending on your surface and the thickness of your paint, you may need a second coat. Since I was painting on glass, it was difficult to get full coverage with just one coat. A quick second coat did the trick.


2.While the paint dried, I pulled out my DML page kit and assembled the die cuts using adhesive. I wasn't sure which ones I'd be using for my sign quite yet, but since I'd be putting them on my page kit, I assembled all of them. Look at that little glue nozzle! Seriously, I can't get over this adhesive.

3. The hardest part for me was deciding which categories to include. I wanted to capture some basic information, but also capture his little personality. Here's what I ended up with: 
Grade
Age
School
Teacher name
Favorites: Color, Food, Toy, & Activity
Best Friend
What I want to be when I grow up

4. Write your information with chalk on your board. I started with Nolan's name, making it the most prominent. I wrote the category titles in white, and then alternated colors. Here's a couple extra tips for writing:
  • I freehanded the writing, but you could create a stencil for your chalk writing or you could cut the categories in vinyl if you want them to be permanent. I decided that I'd rather capture "mama's handwriting" rather than perfection, so I just wrote it out.

  • Water is your friend here! I soaked a paper towel in water and rubbed the chalk into it - kind of like chalking up a pool cue - before I wrote. It's easier to control the chalk and color goes on smoother and deeper.  In the bottom photo, you can see that I used the water technique for the blue letters, but did not for the letters below them. The green "4K" is a little more splotchy. I fixed it by wetting the green chalk and filling it in.
5. Place assembled die cuts onto the board. I rearranged them for a while until I found my favorite look. I LOVED using the little stars as category markers! I used some tape to hold them in place for the photo shoot. 


6. Stage your photo! Find a cute tree or building to take your photo in front of. Be aware of your backgrounds! We used Nolan's little play shed since the rich, dark blue was so pretty as a background. Be creative with it! These are my favorites from the shoot. What a cheeseball. 


7. After your photo shoot, take the die cuts and place them on your page kit! Print out those adorable photos, adhere them down, and you've got your memories saved on this adorable little page kit! 


Now that you've got the chalkboard created, store it in a safe place and pull it out for the last day of school. Snap some photos, see what's changed, and marvel in your kiddo's growth. Each year from here on out will be easy as pie! Grab your chalkboard, a new First/Last Day of School kit, and get those photos! If you do it each year, you'll end up with a perfect album that shows your child's growth each year - perfect to set out at their graduation party! 


Saturday, August 11, 2018

Project: Photo Expansion Pocket Mini Album


If you're anything like me, when you sit down to scrapbook your photos, you've got way too many photos to choose from - and each one of them is great it their own way! It's so hard to narrow them down! Especially when they are photos from an important milestone or event. But, if this is your struggle, too, today's project can help!


Last Wednesday, we reposted a video from Troom Troom on our DML Facebook page that showed how to make an expandable mini-album with pockets as a travel journal. You can see it here. It used minimal product, was useful, and was super cute! And it got me thinking...could I use this idea in a scrapbook layout? Happily, the answer is YES! and I had the perfect kit to try it out on! I love the First/Last Day of School layout, but I definitely took more than just a couple photos on the first day of school. This mini album allowed me to use ALL of my photos! I didn't have to leave any out! Below, I've outlined the steps to make a simple, expandable, accordion-style mini album that you can display on its own or, as I did, add it to a scrapbook layout. I would recommend watching the short video to get a quick idea of how it works, and then come back here to follow the step by step and see how we used it in a layout. Happy Crafting! 


Photo Expansion Pocket Mini Album

Items Needed:

  • Blank Envelopes - the amount depends on the thickness of the album and number of photo mats you desire. I used 5 envelopes. I also had one additional envelope to use as a tracing pattern.
  • Thin cardboard or similarly structured material. You will need two pieces the same size of your envelopes. For example, if you have 4 x 6 envelopes, you will need two pieces of thin cardboard size 4 x 6 each.
  • Pattern Paper. You will need two pieces, each slightly larger than your envelopes. I used less than one 12 x 12.
  • One 4 x 6 cardstock - Choose your color to match your pattern paper. 
  • About 24" string, ribbon, twine, or other desired material to tie album closed.
  • Your choice of adhesive. 
Instructions:

The first step is to assemble the envelopes to create the accordion of photo mats and pockets. Take your envelopes and lay them on your work space facing the same direction with flaps up. This will help you line them up correctly when you adhere them. 


Take your first envelope and line your adhesive around the flap of the envelope. Do not put any adhesive on the pocket side of the envelope. 

Bring second envelope over the flap with adhesive
Line bottom of the envelope up with natural crease


This is how the two adhered envelopes should look. The bottom envelope is the original envelope with adhesive on the envelope flap. It is now adhered to the bottom of envelope number 2.
Back view of the two adhered envelopes

Next, take the bottom of an additional envelope (still flap side on bottom - the same position as the first envelope) and line it up with the bottom line of the flap of the first envelope. You should have one long rectangle after adhering that bends naturally at the original flap fold. Press down to adhere tightly. 

Repeat these steps to adhere all remaining envelopes. Then, fold back and forth in an accordion style. Set aside for a moment.

Next, we'll assemble the front and back covers. Using a pen or pencil, trace a spare envelope onto your thin cardboard - once for the front cover and once for the back cover. Cut them out. If you don't have a spare envelope, you can simply use a ruler to match the dimensions of your envelopes.


Take your pattern paper and line the cardboard piece up, making sure you capture what you'd like to see on the front. For example, my pattern paper was lined, so I made sure the lines were straight and that they lined up nicely on the top and bottom of the cardboard. Once it is lined up, cut out your pattern piece leaving an additional half inch around each side. This extra half inch will be folded around the back to adhere.


Flip the paper over and place the cardboard in the center. Then, fold each side over, creasing the pattern paper along the edges.


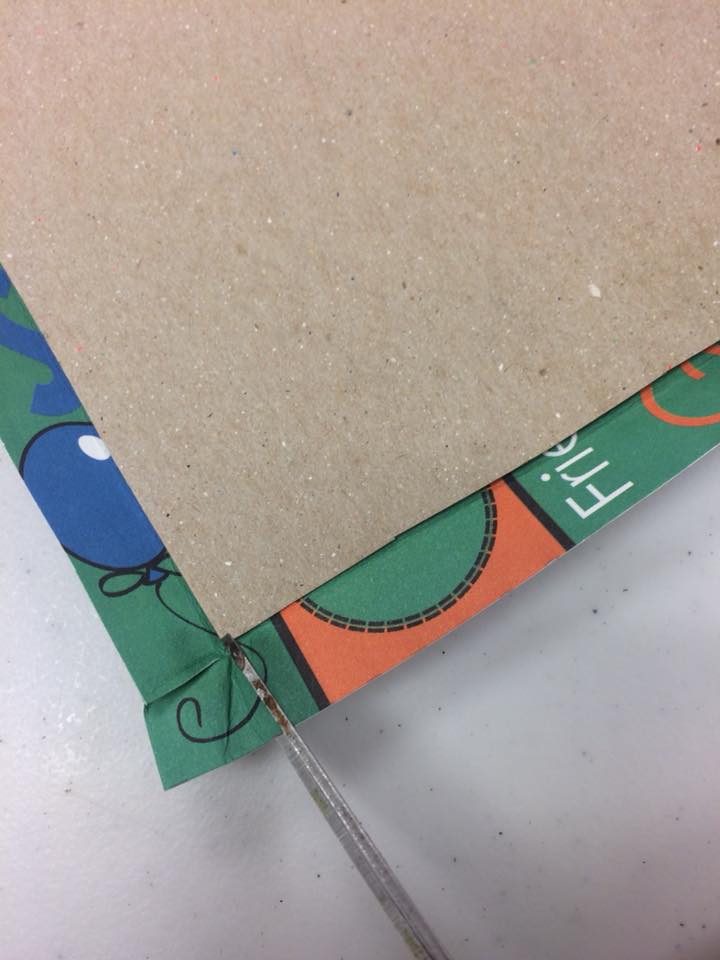
Next, cut the corners out of the pattern paper following the creased lines you made by folding them. This will allow the paper to lay nicely against the back when you adhere it.


Finally, glue down each side.


Here's what it looks like when it's finished. Repeat these steps with your second piece of cardboard.


 Next we will complete the inside of the front and back panels. First, determine which panel you would like to be in front and which to be in back. Take your front panel, and with the inside facing up (the side with the cardboard peeking through), adhere a piece of cardstock to the center to cover the cardboard. The size of the cardstock will be determined by your envelope size. My envelopes were 5 x 7, so I was able to use the 4 x 6 photo mat that was included in the First/Last Day of School Scrapbook Kit. 

For the back panel, take your string/ribbon and cut it in half. Adhere one half of the string about halfway down on the left hand side and the other half of the string about halfway down on the right hand side. You do not have to place cardstock over this
 panel. We will cover this in our next steps.

To add the accordion envelopes, we will start with the back panel. Lay the back panel with the cardboard middle facing up and the strings spread outwards. Line it up to keep the envelope with the unglued flap on top of the stack (like the first photo). Then place adhesive on the inside of the back panel, adhere directly to the address-side of the last envelope in the stack, and press down to adhere. When you open the accordion, the last page (adhered to the back panel) will look like the second photo.


To adhere the front panel, place adhesive on the top envelope flap only. Do not put adhesive on the pocket part of the envelope. Then adhere the flap to the cardstock on the inside of the front panel.


Your album is now assembled! Here are a few photos of what it should look like when completed.

Now you can adhere your photos to the address-side of the envelopes and use the pockets to place keepsakes or extra photos! I placed my photos in, adhered some die cuts to the front to give it an additional interesting visual effect and then added  it to my layout. Look how cute it turned out!

Mini Album assembled and closed on layout.
Mini album expanded on layout

We love the millions of possible uses for this mini accordion album. What a great way to add extra photos to your layouts - or even to keep as a separate mini album.  And the pockets! So handy! We'd love to hear how you plan on using this idea. Drop a comment or a photo of your project! Happy crafting!