
Before we look at the changes, let's take a moment to admire the cuteness of this layout in its original form!
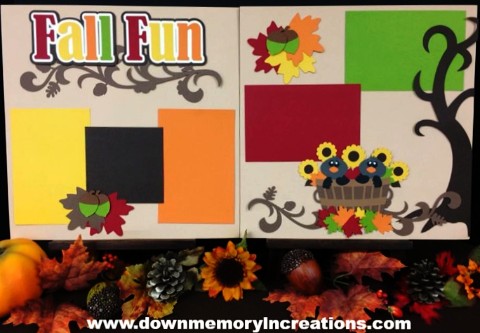 |
| Original Fall Fun 2018 |
 |
| The full 3-page expanded Fall Fun 2018 Layout |
Now, there are a few things I think about when I'm adding a 3rd or 4th page. First, I need to make a background choice. Sometimes, it's most obvious to just match the color of the original, which is what I eventually decided on, but with this layout, there are so many color options! I played with the idea of making the middle background a much bolder fall color, but I decided to play with color in my mats and pattern paper.
After I decide my background color, I then take a look at what came with the kit and start playing around with where the items might go. Sometimes, I keep cuts together - like I did the the leaf/acorn sprays - and sometimes, I decide there's enough going on in a section to spread it out - which I did with the basket of leaves. You can see the changes in these two photos:
|
| The original layout has leaves inside and outside the basket with crows. The leaf/acorn sprays are set up here, too. |
 |
| On my layout, I took the leaves from outside the basket and placed them on another page. The basket itself and the contents were enough and the cuteness factor stayed high enough to move them. With the leaf sprays, I kept the same idea, but changed up the color groups to fit with my photo mats. |
When I've got my die cut options, I then move on to photo mats and additional paper. I'm a big fan of putting as many photos on a page as possible. I don't want it to look crowded, but the photos are what it's all about, so I leaned into the gorgeous colors in this layout and played around with some space. I like to experiment a little bit with photo mat placement, and - as much as I like symmetry and am conscious of flow - I LOVED the look of three completely different mat layout combinations. The colors popped, and each page had it's own - yet cohesive - feel.
Let's take a look at each page, now and I'll walk you through my thought process.
I knew I wanted to keep the title on this first page. Then all the actual Fall Fun would follow! 😉 This page looked a little empty, though, so I chose to pull both flourished onto the page to anchor the top and the bottom, and to fill this page with fun and bright photo mats. The yellow and red mats were included in the kit. It's always a favorite of mine to add pattern paper, if possible. It's just an extra, fun feature to make your layout pop. I happened to have a whole sheet of a great swirly, leafy, orange paper that mimicked the leafy swirl cutouts on this layout! I couldn't avoid using it. It was calling to me. So I used some of it to make a whole 4 x 6 photo mat to round out this page! I angled the photo mats to give them impression of them blowing through the breeze and placed the title pieces to avoid covering precious photo space.
 |
| Page 1 |
|
| Page 2 |
 |
| Page 3 |
|
| The full 3-page expanded Fall Fun 2018 Layout |
|
| Original Fall Fun 2018 |
No comments:
Post a Comment