Since we turn THIRTEEN this year, we're releasing 13 new kits this month and for each kit we release, I'm blogging about another way to take that page kit and make it your own. We've shown the versatility in our page kits with our first 8 releases and their revamps. They are great on their own for the scrapper who is in a time crunch, or they are a great starter kit for those who want to use their creativity to take them to the next level. We've explored embellishments, inking, pop up dots, expansion, sewing, journaling, pop out photos, and secret flip up space as ways to make these kits your own.
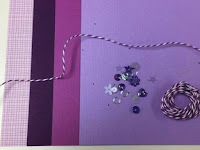
We've got yet another way to revamp your page kits this time AND we're using one of our birthday month weekly specials to do it! This week only (January 19-25, 2019), we're introducing Color Bundles in our online shop. These $5 packs include cardstock, patterned paper, bakers twine, and sequin embellishments in matching shades of the color you desire. They make it easy to make your layouts match your team colors, your party colors, or even just your favorite colors! I'll show you how we did that with our newest page kit, Cheer.
Personalization Option #9: Color Swap
Our new Cheer page kit comes in two color options, Blue or Red. It's difficult to do sports pages that work for every team - there are just so many different color combinations - so when we do use team colors, we often try to use the most common school and team colors. But we know that doesn't work for everyone. So what can you do? That's where our new Color Bundles come in! Find the colors you desire and swap them into the kit to make it work for you.
Here's a look at what you get in our Color Bundles (and they're available this week for just $5!):
Just choose your desired color - for teams, for weddings, to match family portraits - and swap them into your layout!
My family lives in the small town of Osseo, Wisconsin - home of the Osseo Thunder. Our colors are orange and black, so I thought this would be a great opportunity to show how simple it is to take this layout and make it work for the Mighty Mighty Thunder!
First, I took the brightest orange color from the Orange Color Bundle and a bit of Black cardstock from my stash. I also started with Cheer Red because I knew I could use the white pieces included in my layout.
 |
| I chose Cheer Red because I can use some of the white pieces in my layout, too. |
 |
| Orange Cardstock from the Orange Color Bundle, and Black Cardstock from my stash |
After I gathered my paper, I took note of the photo mats and strips that I was removing and cut replacement strips and mats from my cardstock. You can see that the layout has white photo mats and white strips along the sides. I could have kept all of those from the original layout, but I decided that, since our colors are orange and black, I wanted to replace the white strips with black to make it more like my school. I did keep the white photo mats, though. It broke up the color a little bit.
 |
| The red, white, and gray will be set aside and replaced by my orange and black. |
After taking care of the large pieces of cardstock, I took stock of the die cuts. I decided that most of the die cuts could just be transferred to my layout because they were dark grey and white. I definitely needed to change the red megaphone and the pom poms, so I pulled them off of the layout and got to work.
I started with the megaphone. I decided I wanted it to be orange, so I pulled out some orange cardstock, and the die cut and began to trace.
 |
| In order to avoid pencil marks, I flipped both the cardstock and the die cut over to have the smooth side up, so I could trace without worry. |
 |
| Trace the die cut carefully |
 |
| Fully Traced |
Once my die cut was traced, I cut it out with scissors.
 |
| Megaphone cut out |
 |
| Original megaphone with new, orange megaphone |
Once that was completed, I traced and cut out the other die cuts that I wanted to change.
 |
| Tracing the pom pom |
 |
| Original pom and new orange pom |
With all of the red pieces replaced with orange or black, I'm ready to assemble my page kit! I also decided to swap the background color to a light kraft paper to look more like a basketball court. So here's the final product!
 |
| Color Updated Left Page |
 |
| Color Updated Right Page |
 |
| Color Updated Layout - Perfect for my orange and black Osseo Thunder! |
You can see how some simple color swaps remade this page kit to match perfectly with my orange and black team! And I still have the majority of the color bundle left to swap other projects and make them work for me! This is such a simple thing to do with any page kit to make it work for you. You get all the basics and the design done for you and you can just swap in a few colors here and there to make it work for you. Such a great option! So check out those Color Bundles, available this week on our website for just $5 and stay tuned for more revamps throughout the rest of the month!


No comments:
Post a Comment